Growing Tomatoes: Common Problems and How to Handle Them
Growing your own food can be fun, educational, and very rewarding. Tomato plants seem to be among the most popular to grow in that regard. Unfortunately, tomato plants can develop a myriad of different diseases and problems, although I find that despite a few issues now and again I am usually able to harvest loads of deliciousness! Even though a lot of things can go wrong in a home garden, there is also a lot you can do, and naturally so, to prevent or handle diseases, bugs, and disorders. In this post I will focus on a few common conditions on tomato plants that I have personally experienced, and what I have found to be helpful in that regard. I will not go into every disease and pest problem that can occur as I am a hobby gardener only, so I will leave it up to the experts to help you with the rest.
Tomato Hornworms
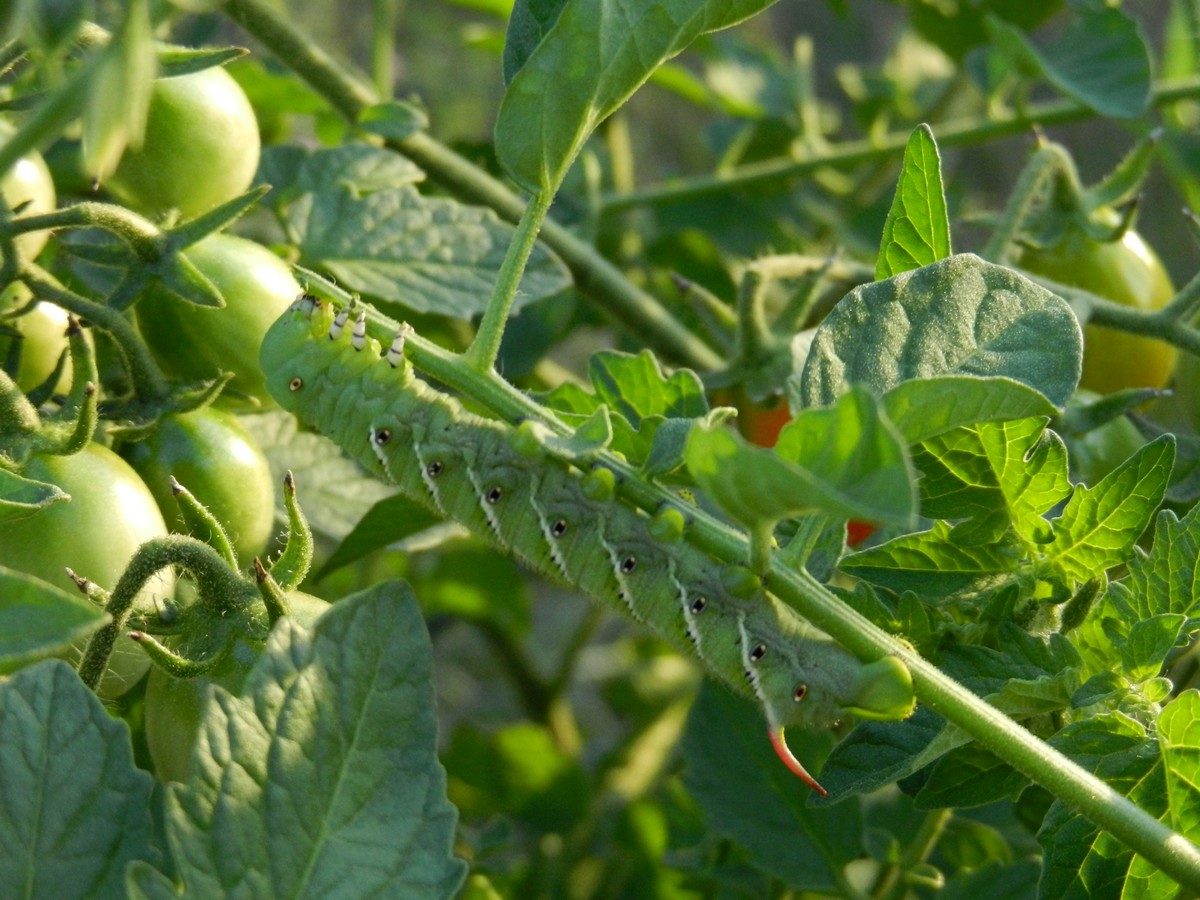
These beautiful (or creepy!) worms are a very common pest in the United States. They can do significant damage if you do nothing to prevent them or get rid of them as they find their way to your plants. If left alone to feast, they will consume the majority of plants and tomatoes, growing several inches long. That’s what happened to my plants years ago as I didn’t even know they existed! There were only two worms on the potted plant pictured below, but it was completely destroyed. I only wish I had a better picture to show you the extent of the damage! Most leaves were gone, lots of twigs chewed off, and tomatoes half eaten. By the time I found the worms (Eeek!!!), this plant could not be saved.
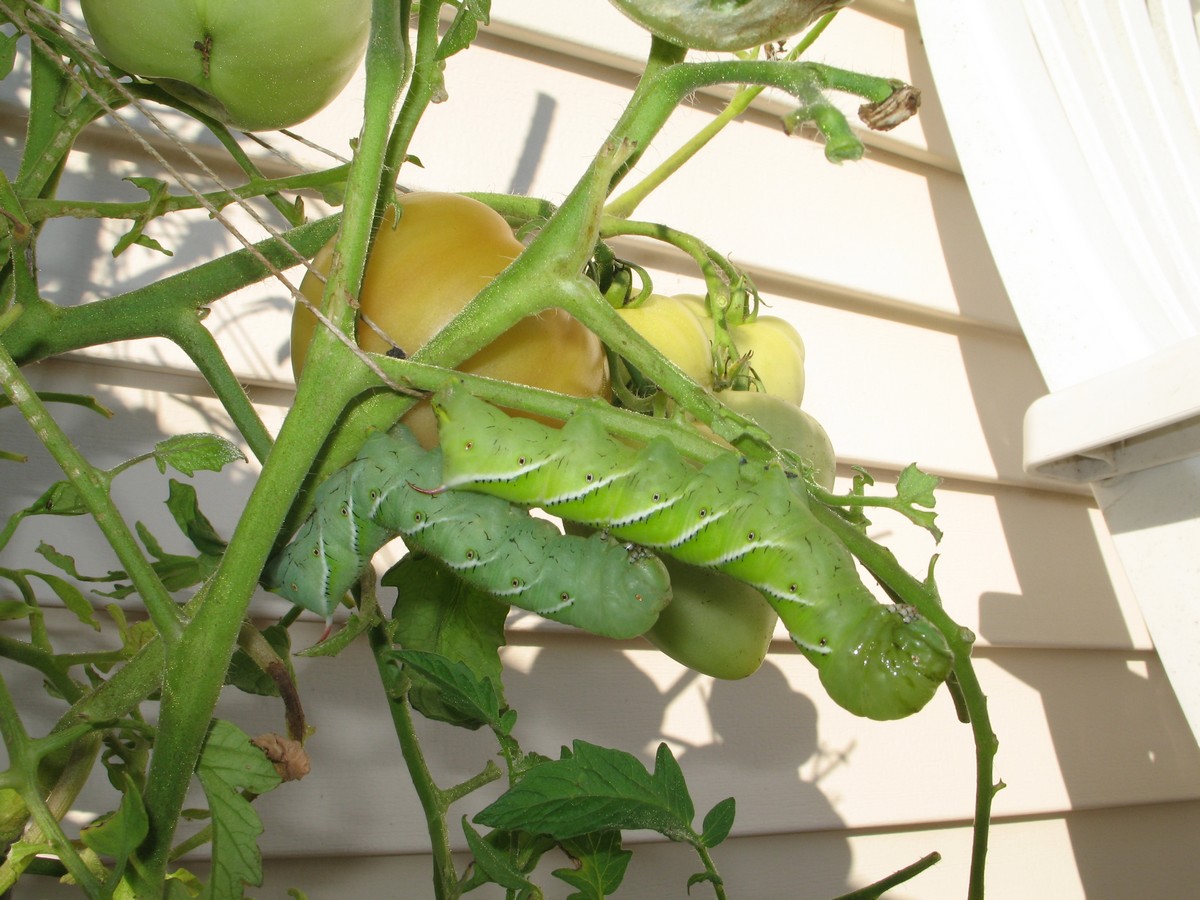
But tomato hornworms are easy to prevent and relatively easy to get rid of once you find them. Since I already wrote a separate blog post (along with pictures) on these worms, identifying symptoms and what to do, I will provide you with this link to it, HOW TO GET RID OF HORNWORMS, rather than going into the details again in this post. It is well worth reading, if I have to say so myself.
Early Blight
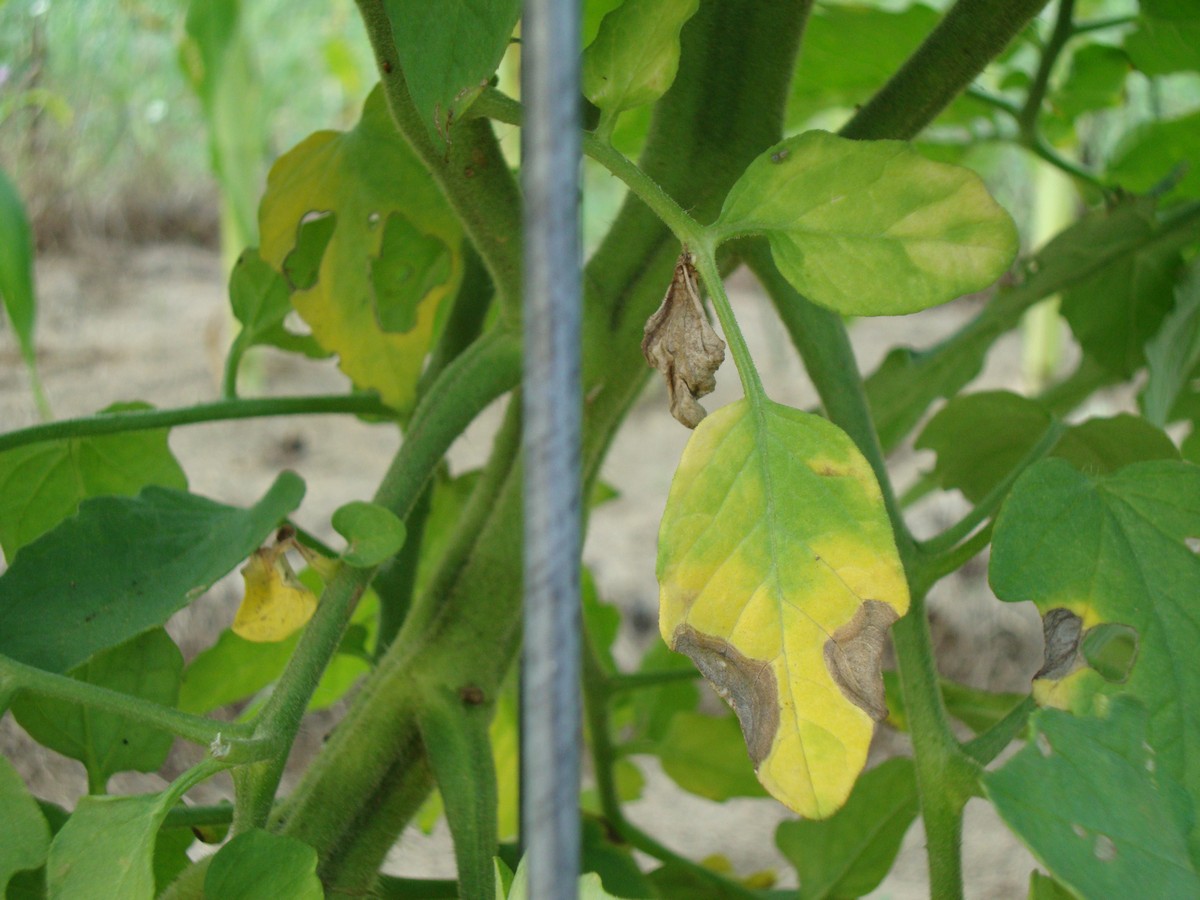
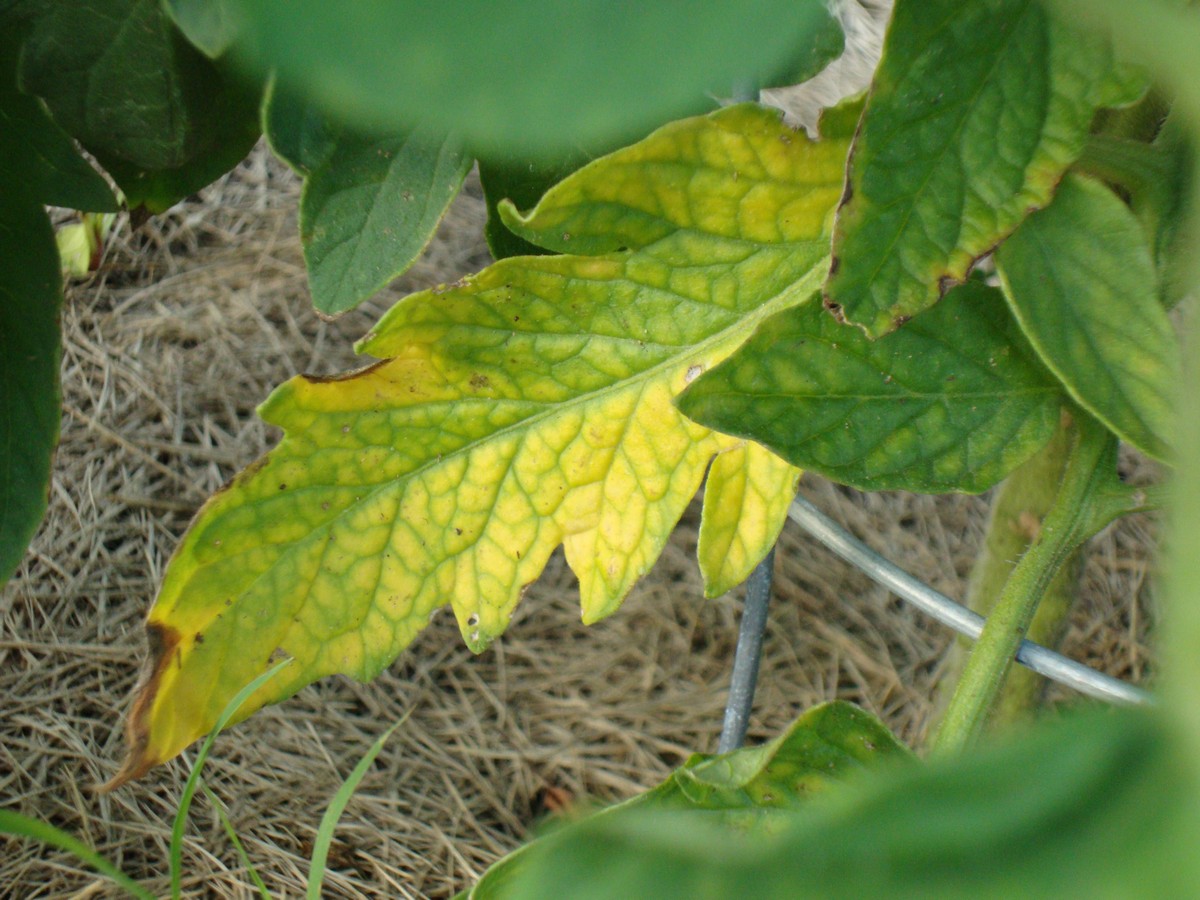
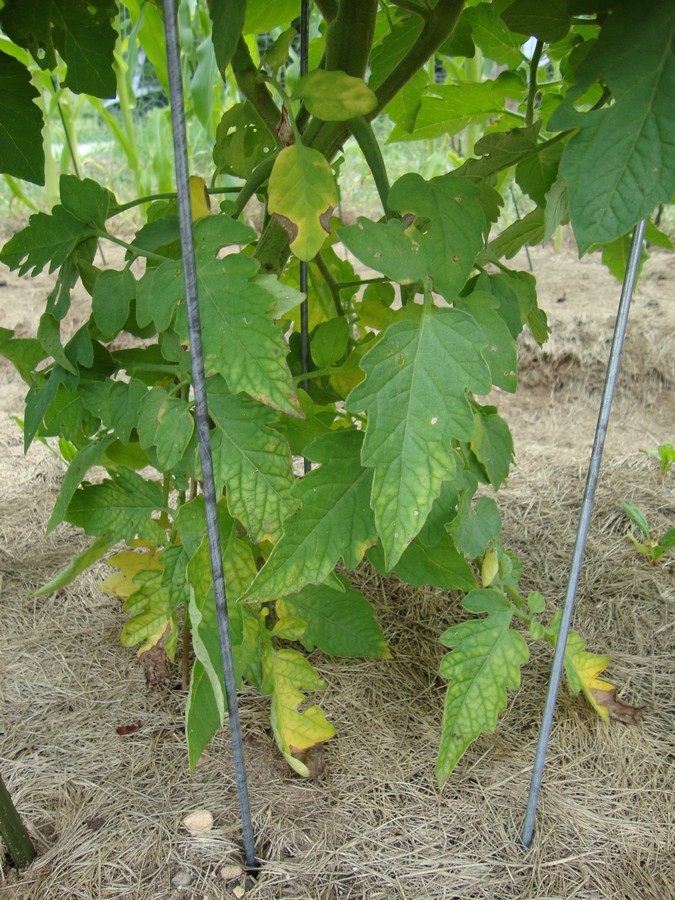
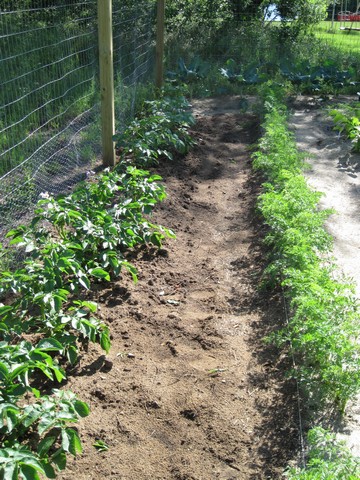
Early blight is a very common disease to find on tomato plants, but also quite manageable. Even though the disease can eventually do considerable damage, such as yellowing and dropping of leaves, it may not a devastating problem until late into the harvest when you’ve already been able to enjoy much of the fruits of your labor (literally!) anyway. This disease can be somewhat prevented, but not necessarily completely eliminated. Early blight is caused by a fungus found in most soils, and can be spread to plants when soil sprays onto low growing stems and leaves during watering or heavy rain. Once on the plant, the fungus will then slowly spread upward and infect more and more of the plant. At the same time, some tomato plant varieties will continue to produce healthy, new growth toward the top of the plant.
To prevent this disease, keep foliage dry: Water early in the day to help the plants dry quickly and definitely before evening, and also try to water at the base of the plants rather than from above. Keep handling of wet plants to a minimum to avoid spreading fungal spores from one plant to another. In addition, make sure your plants are properly nourished to keep them strong and healthy. Low growing stems can be pruned away to avoid soil splattering on them.
If you depend on a maximum harvest, commercial fungicides can be used on the plants for prevention or to keep the spread to a minimum. Personally I like to stick to more natural measures, as described below, and I have also learned not to fret too much about it; if my plants don’t look picture perfect and don’t produce as heavy of a crop as they could have, I still get a very good harvest out of it, so it’s OK! And if the disease in the end takes over my plants, I am usually at the tail end of the season by then, anyway. (I’m in zone 5.)
Mulching can go a long way in delaying the disease. Mulch, such as grass clippings, straw, shredded newspaper, plastic, bark etc., creates a barrier between the soil and the plant, helping to prevent the spread. This year I also plan to use a natural copper spray that I just purchased; I’ve used powders mixed with water before (this one), but the pumps clog up so badly, so it’s been a royal pain! But now that I found a natural, liquid concentrate, I’m all for trying it as copper is said to be very helpful.
Below are a couple more pictures of plants affected by early blight. Notice the yellowing and withered areas; especially circular, withered spots surrounded by yellow margins (also see the picture above):
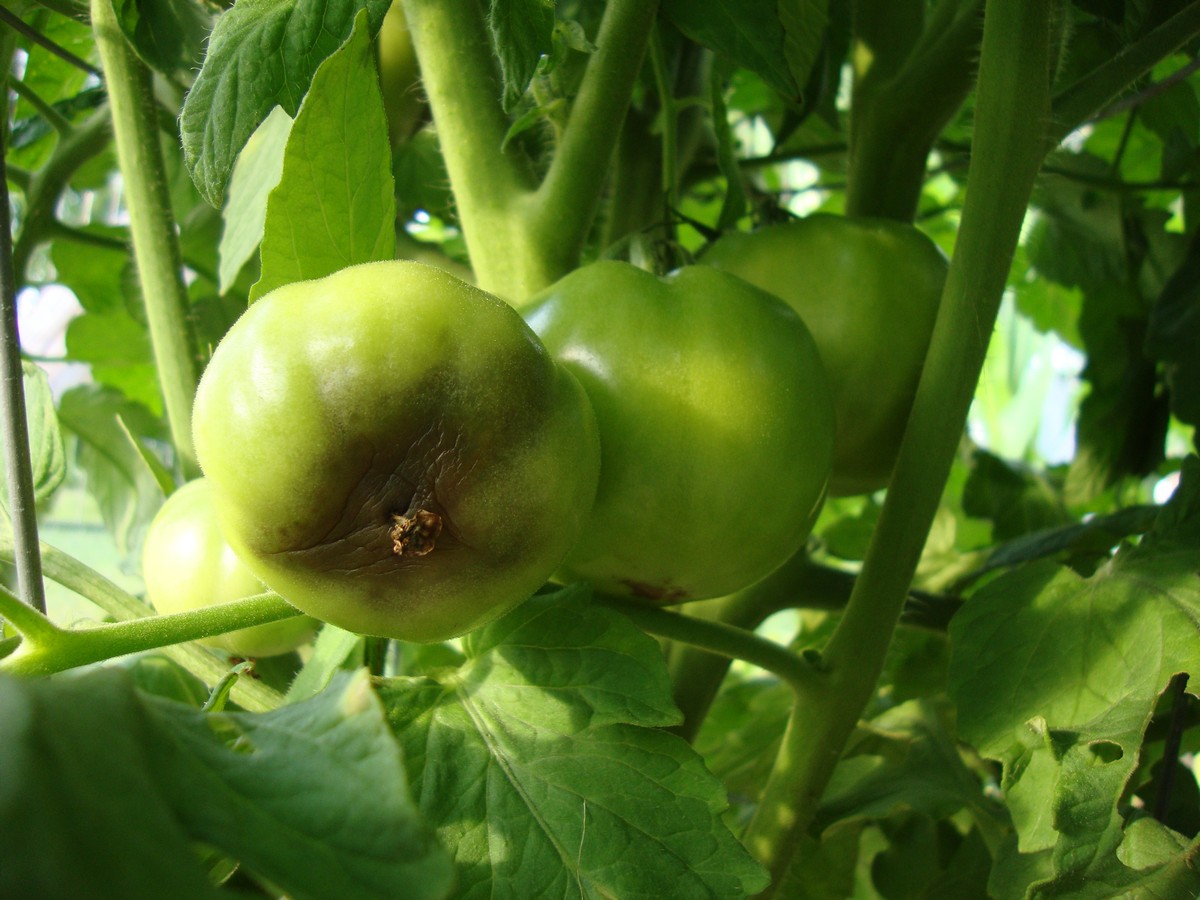
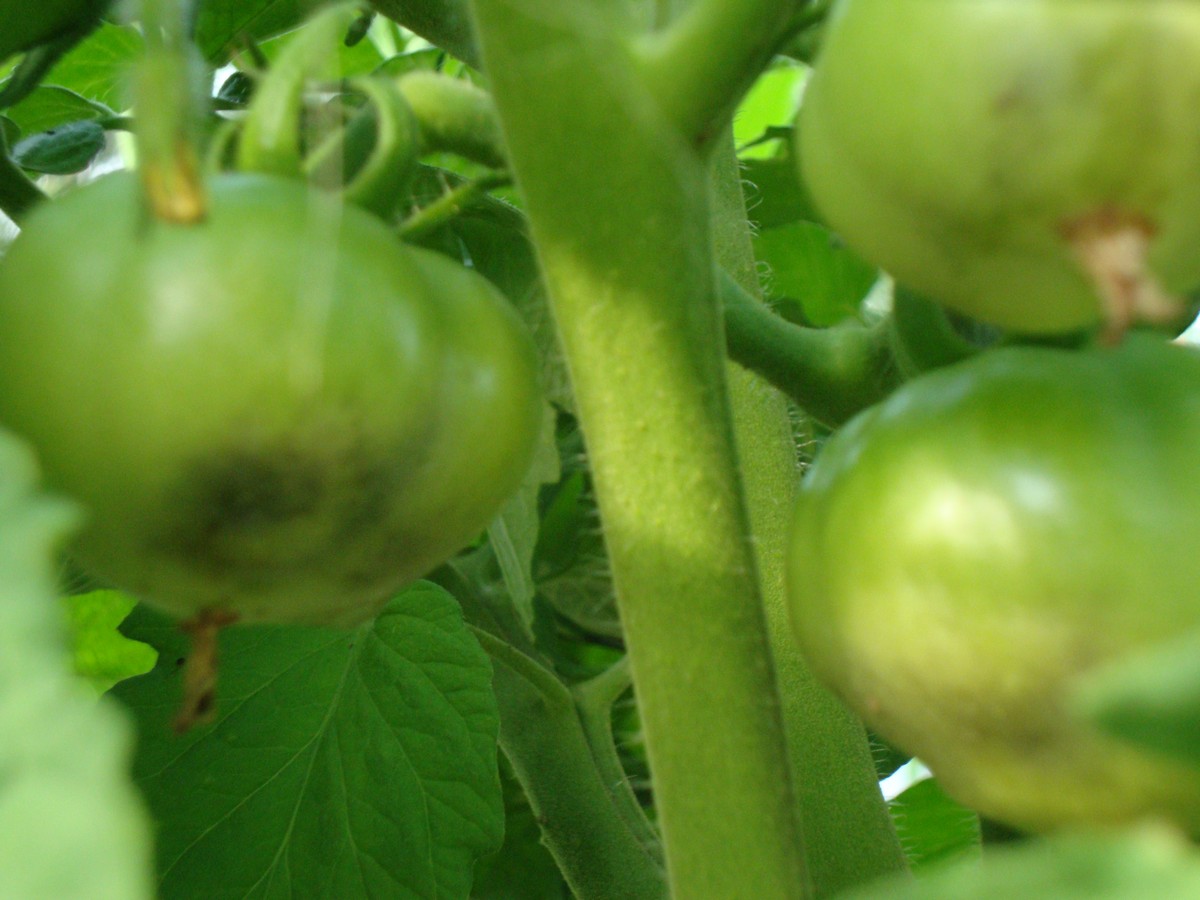
Blossom End Rot, BER
Blossom end rot (BER) is when a dark area that looks like rot forms on the bottom end of the fruit (the blossom end). It is a fairly common condition with several possible causes, but it’s usually not a big problem. The first thing you’ll need to do if this happens is to pick and get rid of the affected fruit, which is the bad news. After that, consider what might have been the cause; the good news is that it most likely won’t be a problem for long:
*Variety: Some plants are resistant to this condition, while Roma tomatoes are notorious for developing BER before the plants are fully mature. Early in the season they may not yet be able to absorb a proper amount of calcium, and blossom end rot is the result. The condition usually corrects itself while you wait it out until the plant matures a bit more. Sometimes people put TUMS or other supplements in the soil to add calcium, happy when it seems to have fixed the problem, when in reality it was the maturing of the plant that took care of it, as maturing enabled the plant to utilize calcium (and other nutrients) already in the soil before any extras were added. Just give it some time.
*Heavy rain, inconsistent- or over-watering: Too much water dilutes the calcium in the soil, making it hard for plants to absorb it. BER may be the result. Calcium absorption is also difficult if the soil is too dry. You can’t control rain, but watering is easy to adjust.
*PH: If the PH levels of the soil are too low (acidic), there can also be problems with the absorption of calcium. You can easily take a soil sample to a garden center to have it tested; bring in a good cup or so if you do. Testing is easy and pretty cheap.
*Over fertilizing with nitrogen during the early fruiting stage: Too much nitrogen will cause tomato plants to grow too rapidly, with resulting BER due to an inability to absorb enough calcium. Do you see the pattern here, yet? “…inability to absorb calcium…” I feel like a broken record!
A balanced fertilizer such as 10-10-10 is convenient to use overall in a vegetable garden, also for tomatoes. These three numbers tell you the ratio between different nutrient in the package. For tomatoes though, the ideal is for the middle and last number to be higher than the first. If there is also calcium added, this would be a bonus. The first number shows nitrogen (N), the middle represents phosphorus (P), and the last one is potassium (K), so you want it to be a little lower in nitrogen.
Tomato Tone, which is organic and also contains calcium and other macronutrients, has the N-P-K ratio of 3-4-6. So, in other words:
3-4-6
=
Nitrogen-Phosphorus-Potassium
Fertilize before planting and also throughout the season, following the instructions of the package.
*Depleted soil: This is not a typically cause of blossom end rot; the fact that people also usually see BER in the early season rather than late, suggests that it’s a nutrient absorption and maturing problem rather than lack of calcium. However, if you really believe the soil lacks nutrients, it is time to reapply fertilizer through the roots to allow the plants to distribute nutrients throughout. Using a fertilizer with calcium before planting, then every few weeks, should help if depletion is the problem.
It may seem like a good idea to use natural resources such as crushed egg shells and the like; however, it takes too long for them to break down and for calcium to become available. If depletion is the problem, you need a quicker fix than that. I would add a manufactured fertilizer with readily available nutrients. This fertilizer by Bonide supplies calcium and is mixed with water before applying, making the nutrients immediately available.
Below is another picture; although a bit blurry, you can still get an idea of what blossom end rot might look like in the earlier stages:
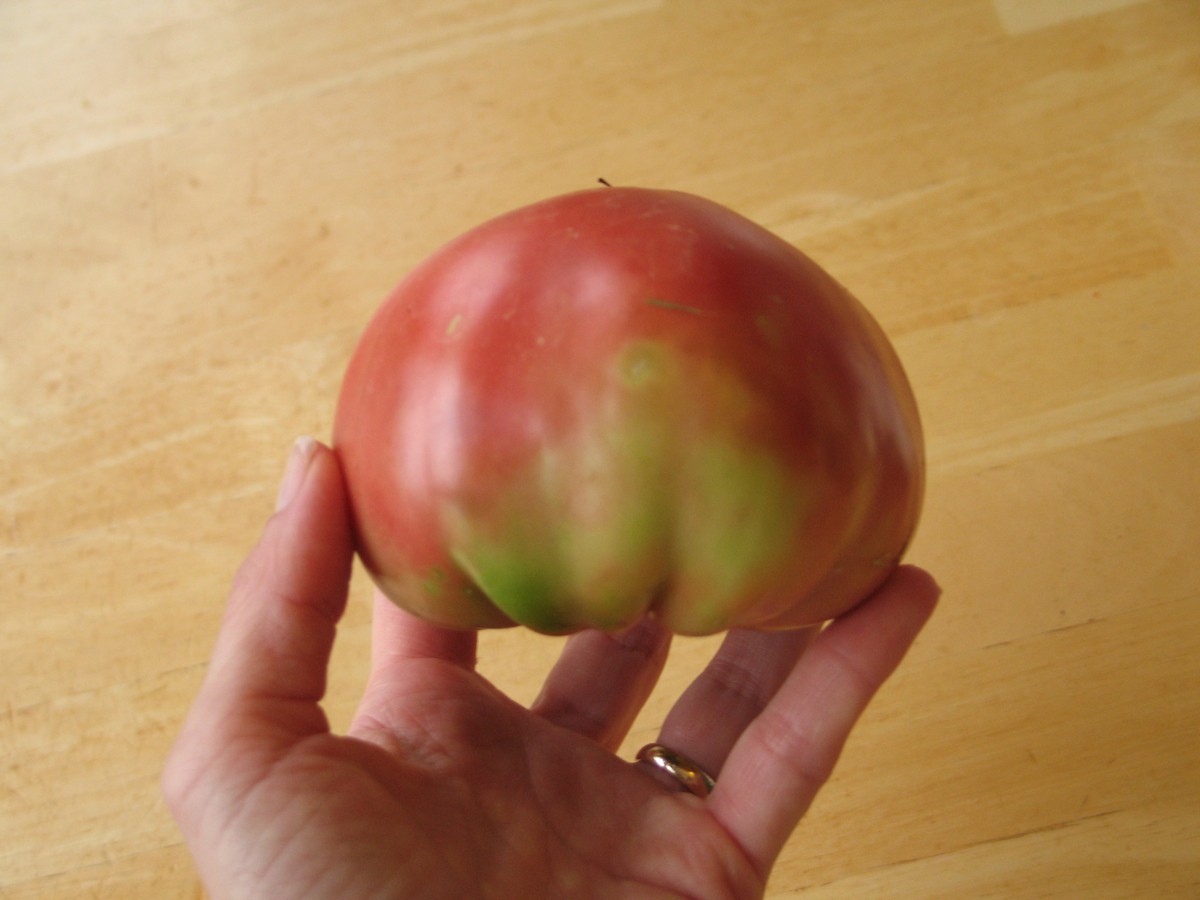
Cracking / Splitting of fruit
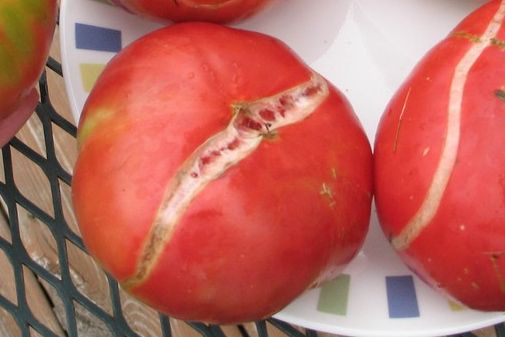
Tomatoes with cracked or split skin are very common after heavy rain or over watering. This is especially true for cherry tomatoes, although I see it all the time on my grape tomatoes as well. I usually don’t see this on regular sized tomatoes, with the exception of the heirloom in the picture above. But here’s what happens: When tomato plants are over watered, they soak up too much water in one sitting, causing the tomatoes to burst. If a heavy rain is expected, cracking can be prevented by picking nearly ripe fruit before the rain starts and letting the tomatoes fully ripen inside. Watering, of course, can be controlled: Water smaller amounts more often instead of waiting until the plants are dry and then flooding them. Years ago when I had tomato plants in pots, I would sometimes find the soil dry to the core during hot weather. I found that watering only a small amount at a time for the next couple of hours helped prevent tomato splitting.
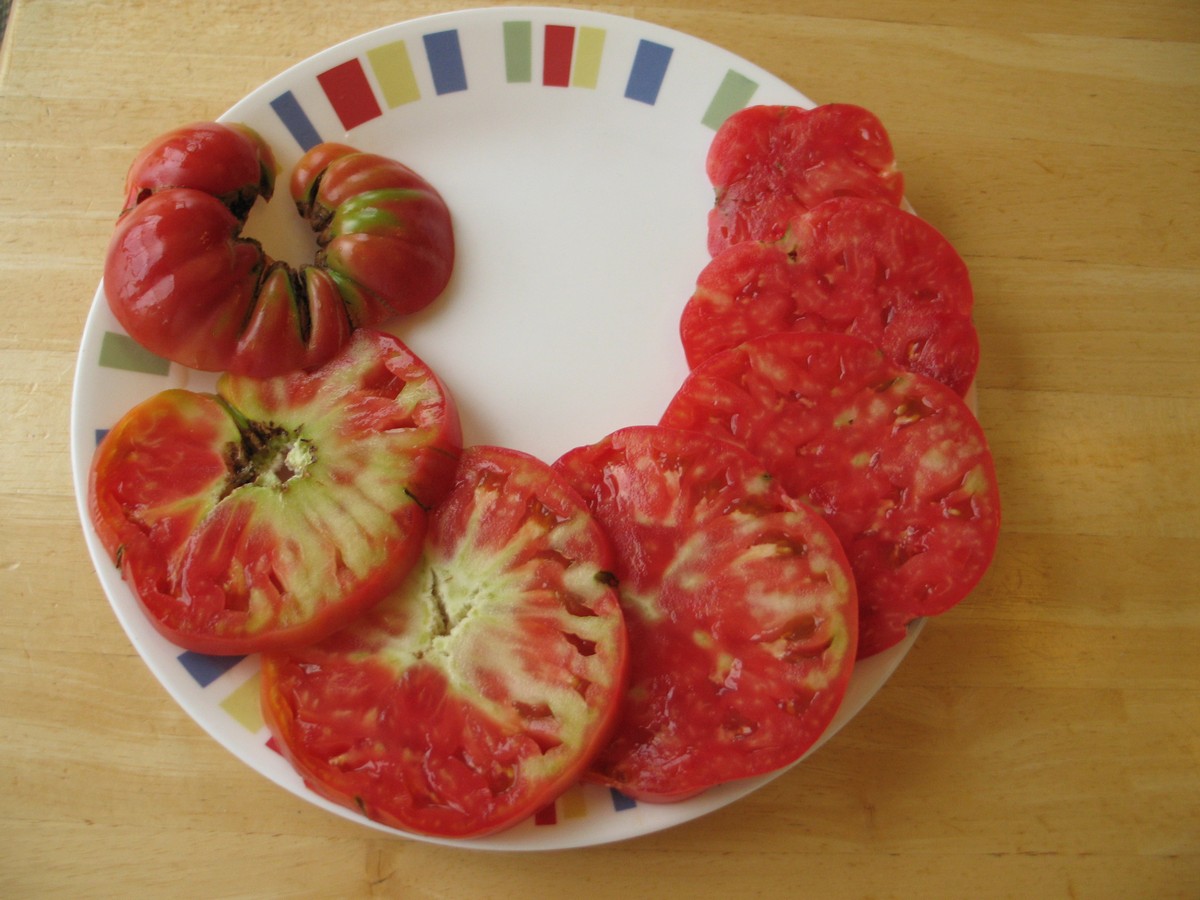
Green shoulders
Tomatoes with green or yellow shoulders are edible, but when cut open you’ll find that the green areas are firm, pale, or green even on the inside, and also rather dry and unpleasant. I have seen green shoulders on tomatoes only on a rare occasion, so it isn’t something I know much about. While trying to find information about it, it seems to me to be caused in part by high temperatures in the fruit, and it is possible that problems with PH or nutrients in the soil can trigger it as well. Since you can’t do anything about the weather, your best bet might be to plant varieties that are disease resistant, such as hybrids. If you live in an area where it does get really hot, avoid pruning away too many leaves to give the tomatoes themselves some shelter from the sun. Or, if you are of the creative type, figure out other forms of shading during the hottest part of the day. You can also have the soil tested for problems.
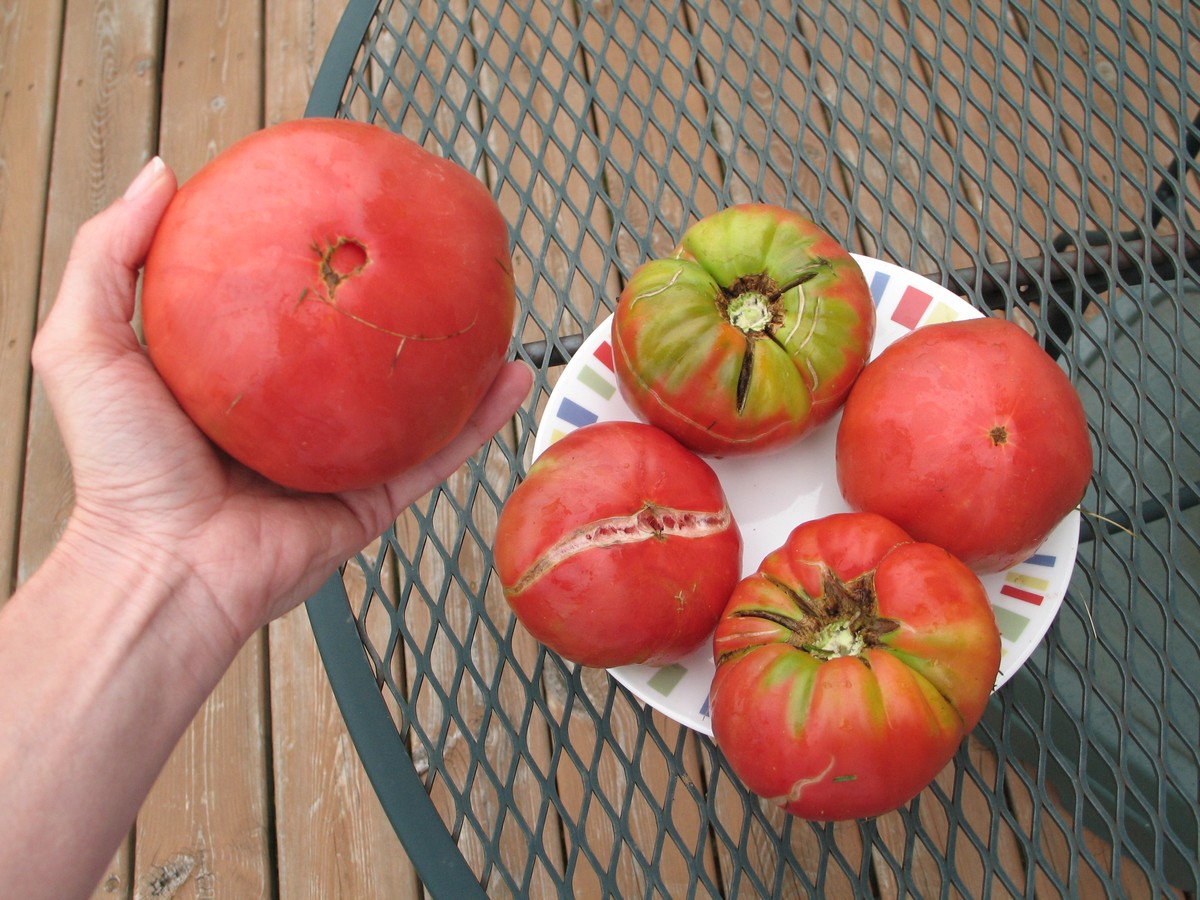
The pictures below show tomatoes from an heirloom plant with multiple problems; green shoulders, cracking, catfacing, and zippering. Several of these problems can occur during adverse weather conditions, so that might have been the culprit for this plant. I had other heirloom plants at the same time that didn’t have these problems though, so the type of plant definitely matters.
Even though there can be some problems here and there, I find tomato plants so fun and rewarding and usually end up with a bountiful harvest of delicious red tomatoes straight from the vine. Whether you’re dealing with common issues like blight, worms, or blossom end rot, there are many natural solutions to different problems. By learning a little bit and taking some simple, preventative measures, growing tomatoes is so worth it in the end! Also see my other posts on tomatoes: Part 1: Seeding & Transplanting Seedlings, Part 2: Transplanting Outdoors & Care, and Tomato Hornworms and How to Get Rid of Them.

Here are a couple of hints to help with your tomatoes (and by the way, this page of yours is excellent).
1. If you have hot summers, give your tomato plants light shade from about 11 a.m. to about 3 or 4 p.m. This will keep the fruit from scalding (large white patches on areas that face the sun, and these areas are prone to rot). The use of floating covers is ideal. Floating covers are a light, white almost gauzy material that you can put right on the plant itself during the heat of the day. Because we have raised beds, I stake the corners and use large clips to fasten the covers on that way. One side then can be easily folded back to the stakes on the other side when I don’t want the tomatoes covered.
2. Soaker hoses are ideal for tomatoes. They go slow and deep. Mulching over the hose keeps all water off the plant.
3. If you live near a feed store, invest in some of their large black rubber watering tubs. Drill drainage holes (lots of them) in the bottom. Fill with good soil and plant one or two tomato plants in each. Tomatoes love carrots, so you can put some carrot seeds around the sides. This year, instead of staking my tomatoes, I allowed them to fall over the sides of the three tubs I was using. The black of the tubs warmed the tomatoes early, and the harvest was unbelievable and early as well. (Those tubs don’t allow gophers or moles to interfere either! I have four tubs and seven wooden raised beds. Knowing what I know now, I would go with all tubs. If you move, you can take them with you, and they never rot or fall apart).
4. Once the nights have dropped below 55 F. stop watering your plants. The tomatoes will ripen for a week or so more and then the season is done.
I had some tiny tomato seedlings growing in 16 oz clear beer cups in one of those indoor mini greenhouses. They were just 8 days old. I forgot to zip the greenhouse one night and cups dried out. Instead of lightly watering as I should have, I watered them thoroughly with a solution of water with a tiny bit of Miracle Gro. Then I moved them to an identical greenhouse on the front porch where it was cooler. Big mistake! They were not near ready for fertilize or hardening off, as I learned from reading your wonderful informative blog! Within hours the plants were dropping and the stems looked like plant was suffering from dampening off disease. Since I used a sterile seed starting mix, I think I loved them to death. Well, now I replant seed for that tomato heirloom variety, Granny Cantrell German Red/Pink. This time, you information should help me along. I always thought that the seed starter mix was just a special potting soil and would carry the plant through until time to transplant into the garden. Now, I wonder if I need to plant in very small containers or flats and later transplant to the regular size 6 packs or small pots. Am I doing wrong by starting with the larger containers?
I’m sorry you lost your plants! It’s a good thing they were small plants so that you still had time to start over. Hope all goes well this time around!
You don’t have to start the seeds in tiny pots, but personally I avoid really large containers so that I have a chance to transplant them deep one time while they’re still small. Then I plan deep once again when I transplant for the final time outside. Otherwise you can start them in the bottom of a large container with just a little bit of soil in them, then fill more soil as the small plants grow taller. The point is to allow the plants to grow roots from the stems while they’re young plants.